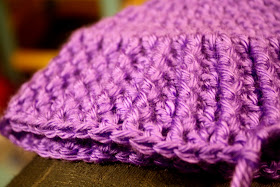
OK that's enough of that.
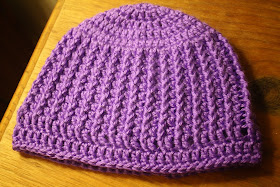
I made the hat for my oldest daughter to wear on a field trip. I got a lot of compliments on the hat, and have even sold 3 so far. Alright then, lets get to it.
Materials needed:
Size H crochet hook
About half of a skein of yarn. I used Caron Simply Soft for all the ones I have made.
Needle
7/8" ribbon
Stitches Used:
Double Crochet
Triple Crochet
Slip Stitch
Start off by chaining 2.
1. 10 dc in the second chain from the hook. Join with a sl st to the first dc. (10dc)
2. Ch 3, (counts as 1dc now and throughout) dc in the same space as join, 2dc in each st. Join with a sl st to top of ch 3 (20dc)
3. Ch 3, dc in the same space as join *1dc in the next st, 2 dc in the next* repeat from * Join with a sl st to top of ch 3 (30dc)
4. Ch 3, dc in the same space as join *1dc in the next 2 stitches, 2dc in the next* repeat from * Join with a sl st to top of ch 3 (40 dc)
5. Ch 3, dc in the same space as join *1dc in the next 3 stitches, 2 dc in the next* repeat from* Join with a sl st to the top of ch 3 (50 dc)
6. Ch 3, dc in the same space as join *1dc in the next 4 stitches, 2 dc in the next* repeat from* Join with a sl st to the top of ch 3 (60 dc)
7. Ch 3 *FPDC around the next stitch, dc in the next stitch* repeat from * Join with a sl st to the top of ch 3
My hat worked out to 10 rows of the post stitching rows for 3 year old, 12 rows for a 5 year old.
8. Ch 4,* FPTC around the next stitch, TC in the next stitch* repeat from * Join with a sl st to the top of ch 4. This is the row that you will weave the ribbon through, and the last row to use post stitches.
9. Ch 3, dc IN each st join with a sl st to the top of ch 3.
I have an idea of a way to sew a bow to the ribbon, and using Velcro as a closing. This way it would be easier to change out the ribbon or to take it out when washing the hat. I just need to get out needles and thread and work on it. I will let you know if I get it figured out the way I want.
This hat can be made smaller or larger by adjusting the hook used, or by adding or subtracting the number of increase rows.


Its a beauty as is your little miss who is modeling it. Really nice work.
ReplyDeleteI made a hat from your directions and it turned out fantastic. Of course a little different but all my stuff turns out different. You'll have to go to my blog and check it out.
ReplyDeletehttp://christinas-created-creations.blogspot.com/2011/01/finished-my-grandaughters-hat.html
I loved your directions and pics really helpful. Thanks.
The colour of your hat is great and the model gets top points :))
ReplyDeleteI love this! I'm going to give it a try soon and I'll post it when I get it done. Thanks so much for the wonderful pattern. Again, your model makes everything twice as beautiful!!
ReplyDeleteI saw your comment over at Glor's place so came by to say hi. I've never crocheted a hat. My cousin has made many and she just wings it, never follows a pattern. I did the first CAL with Glor and wound up with a bowl rather than a doily. :/ I'm pattern illiterate most of the time. You've crocheted so many beautiful things. Hope you are having a great weekend. Tammy
ReplyDeleteThat is such a beautiful hat.
ReplyDeleteI hope you have fun with the macro.
Nina xxx
Ooh--I LOVE this!
ReplyDeleteNice tutorial,I do crochet too and have to try this,Thank you for sharing!Do come and visit my blog,I'm your followers.
ReplyDeleteLove your hat, the ribbon looks so cute. xx
ReplyDeleteLovely hat! I think your model really enjoys her job! LOL.
ReplyDeleteRenee :)
I have made 2, almost 3 of these since yesterday. It's a darling pattern that works up quickly. I found clip on butterflys that I added. You posted a very nice tutorial and excellent directions - Thank you!
ReplyDeleteI just made one of these, and I love it! I used angora bamboo yarn in a dusty rose color, and it looks so chic! I'm going to add a ivory ribbon. Can't wait to make myself one! :) Thank you!
ReplyDelete